Image Resampling Explained: Bicubic vs Bilinear vs Lanczos (Which Is Best?)
 Mujahid H.
- October 22, 2026
- 13 min read

Every time you resize a photo, your software has to decide what the new pixels should look like. Image resampling is the process that makes that decision, and the method behind it is why one resized picture looks crisp while another looks soft, jagged, or ringed with faint halos.
Short answer: use bicubic as the safe default for photos, Lanczos when you want maximum sharpness and are willing to check for halos, bilinear when speed matters more than detail, and nearest neighbor for pixel art. For big reductions, choose a filter that averages many source pixels instead of sampling a few. The right pick depends on two things: whether the image is getting smaller or larger, and what is in it.
This guide compares bilinear, bicubic and Lanczos resampling on the same image, explains the terms you will meet in Photoshop, Pillow, OpenCV and the browser, and ends with a table that tells you what to use for photos, pixel art, UI screenshots and logos.
What Is Image Resampling?
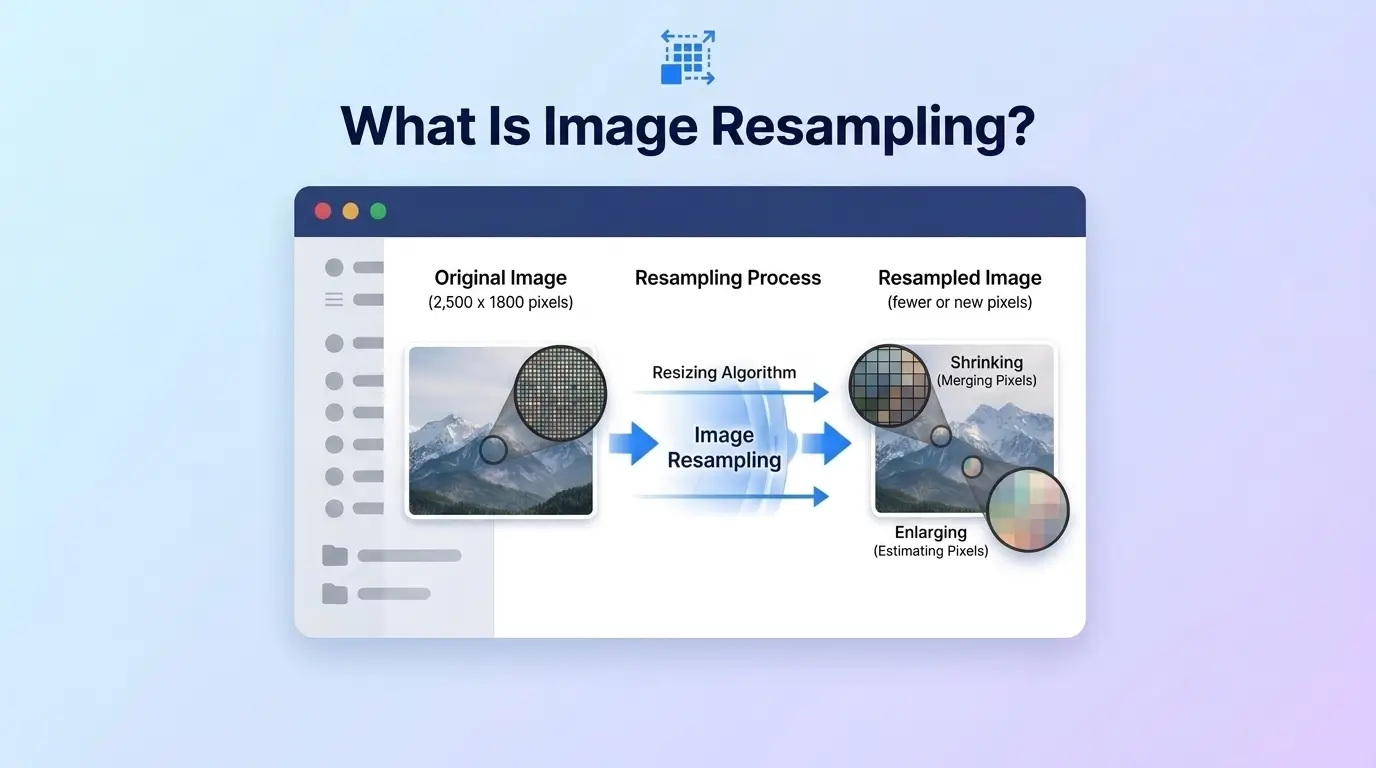
Image resampling is what your software does when you resize an image. It changes the number of pixels and works out a color for every new one. Shrink a photo and pixels get merged. Enlarge it and the software has to invent pixels that were never there. Any tool that does this, from Photoshop to one line of Python, is an image resampler.
Resampling is not the same as changing PPI. Changing PPI alone leaves the pixel count untouched. Photoshop shows the split clearly: the Resample checkbox decides whether pixels are added or removed, and the menu beside it picks the method. Adobe documents each option in its Image Size dialog.
Nearly every tool offers the same image resampling methods, also called resampling algorithms or techniques: nearest neighbor, bilinear, bicubic and Lanczos, plus area averaging.
Image Resampling vs Interpolation
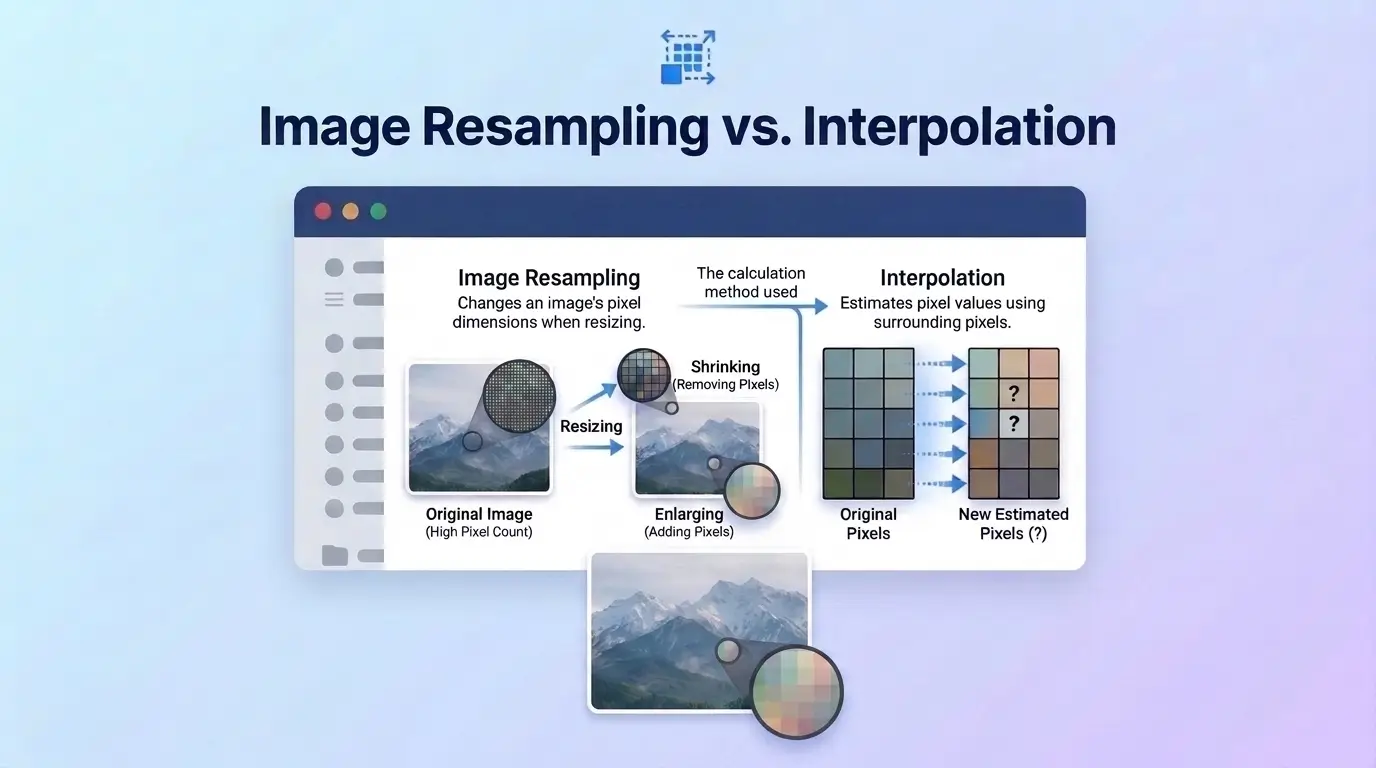
The two terms are often used as if they mean the same thing. In digital image processing, resampling is the whole job of building a new pixel grid. Interpolation is the step inside it that estimates a value between known pixels. Nearest neighbor, bilinear and bicubic are all interpolation methods, which is why searches for image interpolation methods, image resizing algorithms and image resampling filters tend to return the same list.
Downsampling vs Upsampling
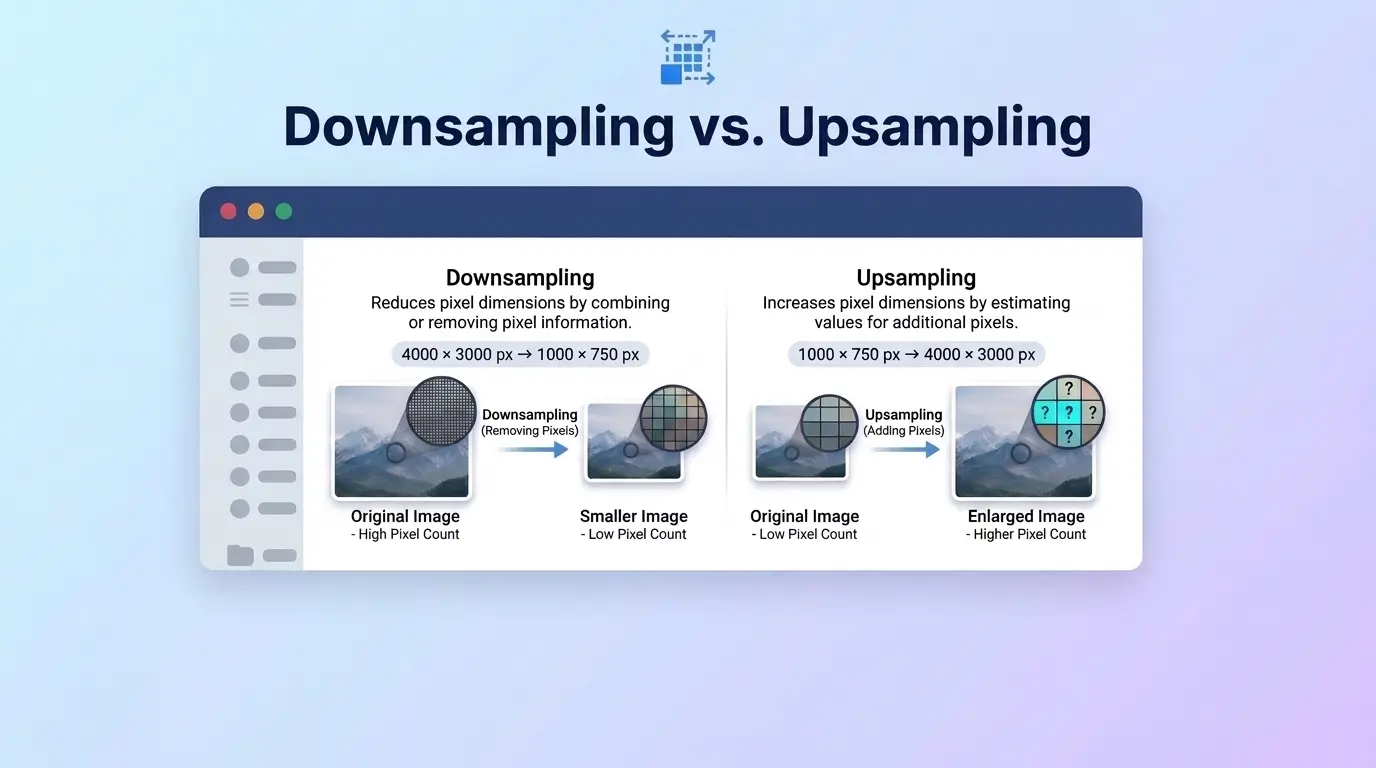
Image downsampling removes pixels. Upsampling adds them. When you downscale, the risk is lost detail and false patterns. When you upscale, the risk is blur and halos, because the software is guessing. No classical method adds real detail, so upscaling only makes a low resolution picture look smoother.
That difference explains why a method that works well among image downscaling algorithms can be a weak choice for upscaling, and why advice on the best image resizing algorithm so often contradicts itself.
How Resampling Filters Decide a New Pixel
To fill each new pixel, the software maps its position back onto the original, then mixes the nearby source pixels. How much each neighbor counts is set by the kernel, also called the resampling filter. A bigger neighborhood and a sharper kernel give crisper edges, but cost more computation and risk more artifacts.
Nearest neighbor uses a kernel that picks one pixel. Bilinear uses a gentle slope across a 2 by 2 block. Bicubic uses a curve across a 4 by 4 block. Lanczos uses a wider shape built from a sinc function, and like the sharper cubic kernels, it has small negative lobes. Those negative lobes are what sharpen edges, and they are also what cause ringing, covered below.
Nearest Neighbor Resize
Nearest neighbor interpolation copies the value of the single closest source pixel and blends nothing. Because it looks at one pixel only, it needs the least processing of any method.
On photos, nearest neighbor resize looks poor. Enlargements turn into visible blocks, diagonal lines become staircases, and reductions drop pixels at random, which can create jagged edges and patterns that were not in the original.
It is the right choice for pixel art, retro game graphics, hard edged icons and screenshots, and data such as masks where blended values would be wrong. Browsers follow the same logic: the default canvas scaling blurs pixels when enlarging, and turning off imageSmoothingEnabled keeps pixel art sharp. Photoshop calls this option Nearest Neighbor (hard edges).
Bilinear Resampling: How Bilinear Interpolation Works
Bilinear resampling estimates each new pixel from the four closest source pixels, a 2 by 2 block, and takes a weighted average in which nearer pixels count more. In image processing, bilinear interpolation blends neighboring pixel values in one direction and then in the other, which gives smooth transitions with no blocks.
The price is softness: averaging lowers contrast between neighbors, so fine detail and thin edges lose some bite. Adobe describes Bilinear as the simple option that gives less precise results and can make images softer.
Bilinear is fast and rarely creates halos, so it still earns its place in previews, video, game textures, batch jobs and modest resizes. It is also the default in a lot of code: OpenCV's resize function uses it unless you pass another flag. The weakness shows on heavy reductions in simple implementations that only sample four pixels, which can alias fine patterns.
Bicubic Interpolation
Bicubic interpolation looks at a 4 by 4 block, 16 source pixels, and fits a smooth curve through them. The extra context produces smoother gradients and edges that look more defined than bilinear gives, at a higher computing cost. Bicubic is often chosen over bilinear and nearest neighbor when speed is not an issue.
Bicubic is a family, not one filter. Catmull-Rom, Mitchell-Netravali and B-spline variants all count as bicubic resampling, and they balance sharpness against smoothness differently. ImageMagick orders its named cubic filters from blurry to sharp as Spline, Robidoux, Mitchell, RobidouxSharp and CatRom, with more halo as sharpness rises. That is why bicubic in Photoshop does not look identical to bicubic in OpenCV or ImageMagick.
Bicubic Smoother vs Bicubic Sharper
Photoshop splits bicubic into modes. Bicubic Smoother is meant for enlargement and gives smooth transitions, though it can soften fine detail. Bicubic Sharper is meant for reduction and keeps edges crisp, but if it over sharpens your image, falling back to plain Bicubic is a reasonable fix. Standard Bicubic sits in the middle and suits smooth tonal gradients.
Lanczos Resampling
Lanczos resampling uses a windowed sinc function as its kernel, a practical stand-in for the theoretical ideal filter. It is one of many finite approximations of the sinc filter. It looks at a wider neighborhood than bicubic, and a setting called the number of lobes, often 2 or 3, controls how wide. OpenCV's Lanczos option uses an 8 by 8 block.
In plain terms, Lanczos is a high quality, sharp resize filter that usually keeps the most fine detail of the classic methods, especially on reductions. Lanczos interpolation and the Lanczos filter are the same idea under different names. Several tools pick it by default: the Wolfram Language's ImageResize uses Lanczos unless told otherwise, and Fastly's Image Optimizer defaults to Lanczos3.
Ringing and Halos
The sharpness has a side effect. When Lanczos resamples an image, ringing creates light and dark halos along strong edges. ImageMagick's documentation notes that Lanczos variants add halo rings to sharp lines and interfaces. Ringing is easiest to spot on high contrast edges such as black text on white, thin lines and logos.
Transparency makes it worse. Mitchell is often preferred when downsizing images with transparency, because a wider filter like Lanczos can produce ringing in semi-transparent edges, which looks very bad.
Is Lanczos Better Than Bicubic?
For sharpness and detail, often yes. For the final look, not always. Lanczos keeps more fine detail and is typically rated the highest quality filter in tools like Pillow, though also the slowest. Bicubic is gentler, has fewer halos and gives a neutral result that rarely needs inspection.
So the Lanczos vs bicubic question comes down to your image. If you want maximum detail and will check the result at 100 percent, try Lanczos. If the image has text, hard edges or transparency, or you want a safe result, bicubic or Mitchell is the better bet. There is no objectively best filter for every image, so test on your own material.
Aliasing and Moiré: Why Downscaling Needs Extra Care
Aliasing happens when an image holds more fine detail than the smaller pixel grid can represent, so the detail turns into false patterns. Jagged diagonals are the mild version. Moiré, the wavy interference pattern in fabric, brick and screens, is the harsh one. A filter that samples only a small block ignores most source pixels in a big reduction, so it can create both.
Filters that average every source pixel covered by an output pixel avoid the problem. OpenCV's INTER_AREA is the classic example, and its documentation notes it may be the preferred method for decimation because it gives moiré-free results, though it behaves like nearest neighbor when you zoom in.
Pillow fixed this years ago. Since version 2.7.0, its bilinear, bicubic and Lanczos filters take every contributing source pixel into account, and shrinking in several steps became unnecessary. That is one reason online advice conflicts: older rules such as bicubic for shrinking and bilinear for enlarging come from tools that sampled a fixed small block, and they do not always hold today.
Bicubic vs Bilinear vs Lanczos: Side by Side Comparison
The table below summarizes how the main methods differ. Think of it as a quick image resize algorithm comparison before you look at the same image resized each way.
| Method | Pixels considered | Look | Speed | Typical artifacts | Best for |
|---|---|---|---|---|---|
| Nearest neighbor | 1 | Blocky, hard edges | Fastest | Jagged edges, staircase diagonals | Pixel art, masks, hard edged graphics |
| Bilinear | 4 (2 by 2) | Smooth, slightly soft | Fast | Softness, aliasing in simple implementations | Previews, speed, modest resizes |
| Bicubic | 16 (4 by 4) | Smooth, well defined | Medium | Mild halos on sharper variants | General photo resizing |
| Lanczos | Wider block (8 by 8 in OpenCV) | Sharpest, most detail | Slowest of the four | Ringing and halos near strong edges | Detailed photo downscaling |
| Area averaging | All covered source pixels | Clean, neutral | Medium | Soft when enlarging | Large reductions |
When you compare crops at 100 percent, look for these signs. Nearest neighbor shows stair steps along diagonals. Bilinear shows a soft, slightly wide edge. Bicubic shows a cleaner, better defined edge. Lanczos shows the crispest edge, and at 100 percent you may spot a thin light line beside dark edges. Bilinear vs Lanczos is the widest gap in the set: the softest smooth result on one side, the sharpest and most halo-prone on the other.
Which Resampling Method Is Best?
There is no single best image resampling method, but there is a best choice for each job. Ask two questions: am I making the image smaller or larger, and what kind of image is it?
Best Resampling for Downscaling
For photos, pick a method that takes in many source pixels. Lanczos or an antialiased bicubic works when your tool widens the filter for reductions, and area averaging such as OpenCV's INTER_AREA suits big reductions. Photoshop's Bicubic Sharper is built for this job. Lanczos wins on detail, area averaging wins for clean large reductions, and bicubic wins on fewer halos.
To resize an image without blurring, reduce in one step from the original, use one of those filters, and apply a light sharpen at the final size.
Best Resampling for Upscaling
For modest enlargements of photos, bicubic is the best all-round choice, and Photoshop's Bicubic Smoother is tuned for it. For larger jumps, Preserve Details 2.0 is Adobe's option for keeping sharp edges and fine detail with fewer artifacts, and it includes a Reduce Noise slider. Lanczos can look sharper but may show ringing. Bilinear works when speed matters more than detail.
Classical filters cannot invent detail. AI upscalers can produce convincing texture from very small sources, but they generate it, so check faces, text and product labels, and do not rely on them for evidence or scientific images.
Best Resampling by Image Type
| Image type | Downscaling | Upscaling |
|---|---|---|
| Photo | Lanczos or antialiased bicubic, area averaging for big reductions | Bicubic or Preserve Details 2.0, Lanczos if you can check for halos |
| UI screenshot | Area averaging or bicubic, avoid Lanczos if halos appear around text | Nearest neighbor at whole number steps like 2x or 3x, otherwise bicubic |
| Pixel art | Avoid if possible, otherwise nearest neighbor at whole number ratios | Nearest neighbor at whole number multiples |
| Logo or icon | Use the vector file and export at the final size, or bicubic if raster only | Use the vector file; a raster logo cannot be enlarged cleanly |
| Transparent PNG | Mitchell or bicubic, check on light and dark backgrounds | Bicubic, check edges on light and dark backgrounds |
Photoshop Resample Options
The Resample checkbox in Photoshop's Image Size dialog controls whether Photoshop changes the pixel count. With it off, only print size and resolution change. With it on, you choose a method. These are the Photoshop resample options Adobe lists:
| Option | Use it for | What it does |
|---|---|---|
| Automatic | General use | Picks a method depending on whether you enlarge or reduce |
| Preserve Details 2.0 | Enlarging | Keeps sharp edges and fine detail, with a Reduce Noise slider |
| Bicubic Smoother | Enlarging | Smooth transitions with minimal jagged edges |
| Bicubic Sharper | Reducing | Helps keep sharpness when shrinking |
| Bicubic (smooth gradients) | General use | Balances quality and smooth tonal transitions |
| Nearest Neighbor (hard edges) | Pixel art | Crisp, blocky result without blurring |
| Bilinear | Simple resizing | Less precise, can be softer |
Photoshop does not list Lanczos in this menu. If you need Lanczos, use a tool that exposes it, such as the code options below. Automatic is fine for most jobs. Switch to Preserve Details 2.0 for big enlargements, Bicubic Sharper for reductions and Nearest Neighbor for pixel art.
Other design tools usually hide the choice. Figma, for example, has an image resampling setting in its export options with Basic and Detailed choices, and a blurry 3x logo export can often be traced back to that setting. Most image resampling software rarely names the filter behind the setting, so test with your own files.
Image Resampling in Code and Browsers
Pillow Image Resampling Filters
Pillow exposes filters through the resample argument of Image.resize: NEAREST, BOX, BILINEAR, HAMMING, BICUBIC and LANCZOS. Lanczos rates highest in quality and lowest in speed, and nearest the fastest. Here is the whole job:
from PIL import Image
img = Image.open('photo.jpg')
small = img.resize((800, 600), resample=Image.Resampling.LANCZOS)
small.save('photo-800.jpg', quality=90)In recent Pillow versions the filters live in Image.Resampling, while older versions use Image.LANCZOS. Use img.thumbnail() when you want to keep the aspect ratio.
OpenCV and ImageMagick
OpenCV's cv2.resize takes an interpolation flag: INTER_NEAREST, INTER_LINEAR (the default), INTER_CUBIC, INTER_AREA and INTER_LANCZOS4. Use INTER_AREA for shrinking, and INTER_CUBIC or INTER_LANCZOS4 for enlarging. ImageMagick lets you name the filter with the -filter option, including Triangle, which behaves like bilinear, plus Catrom, Mitchell and Lanczos.
Browsers and Canvas
Canvas scaling smooths images by default. imageSmoothingEnabled is true by default, and its imageSmoothingQuality property sets the smoothing level, with low as the default. Support for the quality setting is limited, so check your target browsers. The choice of method matters: research comparing canvas-based client-side resizing with Lanczos plus a Hamming window found similar file size savings, but noticeably higher image fidelity for the Lanczos approach.
Why Images Look Blurry After Resizing
Resizing always changes pixels, so some change is unavoidable. Downscaling discards detail, upscaling fills gaps with averages, and averaging softens edges. Image quality after resizing also depends on what happens next: saving the result as a JPEG again adds compression artifacts on top of the resampling softness. The effect stays small at normal viewing size when you follow these steps:
Resize from the original file: Never resize from a copy that was already resized.
Resize once, to the final size: Go straight to the final dimensions instead of resizing in several small steps.
Match the filter to the job: Use the direction and content of the image, following the tables above.
Sharpen lightly after downscaling: Apply a light sharpen at the final size, and check the result at 100 percent.
Watch for repeating patterns: For fine repeating patterns, use area averaging or a light blur before the reduction to avoid moiré.
Save with sensible compression: Keep a lossless master, and avoid recompressing the same JPEG again and again.
Enlarge only as far as you need: For logos, go back to the vector file instead of enlarging a raster export.
If you only need a quick resize, a free online image resizer such as the TrimIMG Image Resizer handles it without installing anything.
Frequently Asked Questions
Which image resampling method is best?
It depends on the job. Bicubic works well for most photos, Lanczos gives the sharpest downscales, bilinear is best when speed matters, and nearest neighbor suits pixel art. Match the method to whether you are shrinking or enlarging.
Which is better, bicubic or bilinear?
Bicubic, for quality. It uses 16 source pixels compared to bilinear's four, so edges look sharper and gradients smoother. Bilinear wins only on speed and when you want to avoid halos.
Is Lanczos better than bicubic?
Lanczos wins on sharpness and fine detail, especially when shrinking photos. Bicubic wins on safety, with fewer halos around text, logos and transparent edges. Pick Lanczos for detail and bicubic for clean edges.
What is the difference between resampling and interpolation?
Resampling is the whole resize operation. Interpolation is the math inside it that estimates the pixels between the ones you already have.
Which resampling filter is best for downscaling?
Lanczos for detail, area averaging for clean large reductions, and bicubic for fewer halos. Avoid nearest neighbor on photos.
Which resampling filter is best for upscaling?
Bicubic for small enlargements, Preserve Details 2.0 in Photoshop for bigger ones, and nearest neighbor for pixel art. Lanczos looks sharper but may introduce ringing.
Why do images become blurry when resized?
Because resizing averages neighboring pixels, and averaging softens edges. Saving the result as a JPEG again makes it worse. Resize once from the original, then sharpen lightly at the final size.
What does Resample mean in Photoshop?
Resample lets Photoshop add or remove pixels. Turn it on to change pixel dimensions. Turn it off to change only print size while keeping every pixel.
Can resampling add detail to a low resolution image?
Resampling can smooth an image, but it cannot recover detail the camera never captured. AI upscalers can generate plausible texture, though it may not match the real subject.
Conclusion
Image resampling comes down to one choice: how the software guesses the pixels it does not have. Bilinear guesses fast and soft, bicubic guesses smoothly, Lanczos guesses sharply, and nearest neighbor refuses to guess at all.
- Photos: bicubic by default, Lanczos when you want maximum detail and will check for halos.
- Big reductions: area averaging or Lanczos.
- Pixel art and hard edges: nearest neighbor.
- Logos and transparent images: bicubic or Mitchell, or better, the original vector file.
Resize once from the original, match the method to the direction, and sharpen lightly at the end.
Resize your image in seconds
No installs, no sign-up. Use TrimIMG's free online resizer to change your image's dimensions with a clean, reliable resampling filter.
Found this helpful? Share it with your team:
Hello, it's Mujahid Hussain Creative and Professional Senior Software Engineer with 6+ years of experience building rich and interactive websites. I have a comprehensive understanding of WordPress themes, plugins, databases, and its functions.